Cockpit Drill and Controls: DSSSM
Approaching the car
Start by explaining the benefits of walking around the back of the car (parked on the left) to approach the drivers door. Also that passengers and children are safest when getting into the car from the footpath (not walking into the road).
Doors
Your first job in the car is to explain that the driver's first job when entering the car is to make sure that it's secure.
Briefly explain that it is a good idea to check that the handbrake is on and then to make sure that all the doors are firmly closed.
Explain that the driver is responsible for all doors. Make sure that the driver's door is firmly closed and then point out how the driver can use the passenger door mirror to check the nearside door (the line of the car will be flush).
You might want to mention the rear door of a hatchback, or child locks, but keep the information brief during your first lesson - otherwise you will end up with bored learners. Only cover the information that is necessary for the lessons and then go into detail on later lessons, for example, checking the hatchback door could be done during car safety checks.
Lock the doors?
A question that often crops up is "Should I lock the doors?" There is no hard and fast rule for this - the answer given on the DriverActive web site is:
"Modern car door locks are designed so that they will not burst open in an accident, whether or not the door is locked? This means that there is no direct safety benefit to be gained by locking the doors, quite the opposite in fact. If the doors are locked it may hinder rescuers or helpers in the event of a car accident.
On the other hand, many drivers feel vulnerable to attack, or robbery, when the car doors are not locked; in these cases, locking the doors may help the driver to relax, and therefore pay more attention to driving and by doing this reduce their accident risk."
Some cars have automatic door locking that kicks in at around 10mph. This can be overridden but our advice is generally that you should follow police advice and allow the doors to lock. In the event of an accident where air bags deploy most systems will automatically unlock the doors.
Seating position and Steering reach
When you are satisfied that all the doors are securely closed, and that your learner understands how to check this for him/herself, move on to adjustment of the driving seat.
Explain where the seat adjustment lever is (or switch in vehicles with electronic seat adjusters).
The seat cushion should be adjusted (that's the bit you sit on) so that all the pedals can be reached. When the clutch is pressed down fully, the left knee should be slightly bent and the seat should support the thigh.
Reaching the steering wheel: The learner should adjust the seat back-rest so that the entire steering wheel rim can be reached by running the hands around it while supported by the seat (i.e., without leaning forwards).
Another way to check this would be for them to rest their wrists on the top of the steering wheel with their arms outstretched. Some learners tend to want to sit too close to the wheel, however, you must stress that this leads to discomfort and tension.
Remember to explain how to adjust the head restraints. These should be adjusted so that the supportive portion of the restraint (the bit that the head will hit in an accident) is level with the driver's ears.
The need for a good seat position
It is important for your learners to understand the need for a safe and comfortable driving position and to be able to make the necessary adjustments in order to seat themselves in that position.
A safe position is one where the driver can see clearly out of the vehicle and reach all of the controls in such a way that they can be operated safely.
A comfortable position is one that will prevent excessive fatigue, particularly on long journeys.
It's useful to have a routine that can be learned by rote. This helps to commit the information to memory. For the purposes of this explanation I have used the DSSSM routine, however, there are other methods that can be used. The cockpit drill should take element of your lesson should normally take no more than ten minutes to complete.
Seatbelts
Most people who have travelled as passengers in cars will be familiar with seatbelt use; however, they may need information about the basic rules relating to seatbelts. Start with something like "Are you familiar with how to fasten your seatbelt?" the answer will probably be 'Yes' however watch carefully to ensure that the belt is worn correctly.
Explain that in modern cars, seatbelts are provided in both the front and the rear and that although drivers are not responsible in law for non-use of seatbelts by adult passengers (14 years and older), they should always advise the passengers that it is in their own interests to wear a belt.
Mention that the driver is legally responsible for belt-use by passengers under 14 years of age.
Mirrors
Your learner must learn how to adjust all of the driving mirrors. Although mirrors follow seatbelts in the DSSSM sequence, it may be necessary to adjust the outside mirrors before the seatbelt is fastened in cars that do not have electric mirror adjustment.
Key teaching points:
-
Do not touch the glass
-
Difference between flat and convex mirrors
-
Blind spot (brief info)
-
Blind spot mirrors (limitations)
-
Adjustment from the normal seating position
-
What should be seen in correctly adjusted mirrors
Explain how to adjust the mirrors for maximum rear view from the normal seating position and without leaving sticky fingerprints on the glass. Fingerprints and/or dirty mirrors can have a significant effect on the view in the mirrors, especially after dark.
Briefly discuss different types of mirror glass (flat and convex) explaining the benefits and drawback of each (involve the learner by asking them to notice the difference in view, rather than just telling them).
Briefly explain the concept of 'blind-spots'; briefly because this would be covered in detail as part of the moving-off and stopping procedure..
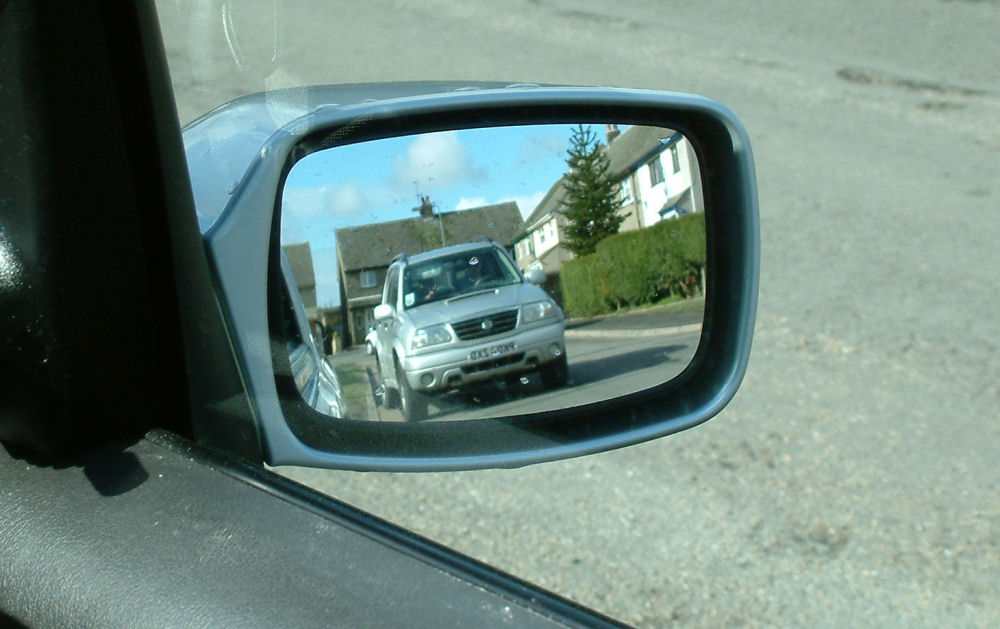
The picture gives an idea of the view from correctly adjusted right door mirror. It is worth taking a couple of similar photos of correctly adjusted mirrors (both left and right) in the vehicle that you will be using for your test to use as teaching aids.
Next: Controls...