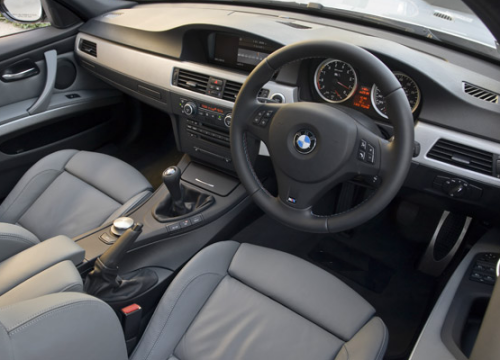
Cockpit Drill and Controls: Controls example
The main controls
 Most instructors teach the main controls by starting with the foot controls moving around to the handbrake and gear lever and finishing with the steering wheel and indicators; but there is no hard and fast rule to say that you must do it this way. Having said that, this is the order that the controls are presented in the DriverActive learner's materials.
Keep your explanation the controls as brief as possible, you only need to cover the key points and answer any questions that your learner has - ideally you want to get the car moving as soon as reasonably possible.
This section will give you an idea of level of detail that is appropriate, you might also want to look at the relevant lesson in the DriverActive programme.
Cram it all in (not!)
As mentioned above you should aim to get the car moving as soon as reasonably possible and practical.
You don't need to cover every last switch and dial, nor do you need to go into minute detail - the learner will be with you for several weeks/months and will have penty of time to learn about things as and when they are required. Initially, only covered what is required to get moving - for example, on a dry day it would not be necessary to discuss the windscreen wipers.
Make the lesson interactive, otherwise the learner will just be bored, they can read about the controls from a book (or the DriverActive web site!) - your task is to bring the controls to life!
This page covers the main controls up to and including the indicators - there should be nothing here that you are not already 100% familiar with.
Accelerator
 Avoid technical jargon when explaining the operation of the accelerator (or other controls) otherwise you risk confusing your learners! If 'jargon' is necessary, make sure that it's explained fully.
It will usually be enough to explain that pressing the gas pedal increases engine power (and generally speaking, speed) and releasing it reduces engine power.
The key teaching points are:
- Referred to as the 'gas' pedal
- Right foot operation
- Must be used gently
- Controls the engine speed acceleration of the car
Explain the term the 'gas pedal' and why you use that terminology (it's quick and easy to say and hear – 'more gas', for example, would mean press the pedal a bit harder, 'less gas', a little less.). Then go on to discuss the operation and purpose - for example you might say something like:
"The pedal is operated with the right foot and requires only gentle pressure to control the speed of the car by varying the power that is available from the engine. Pressing the pedal increases the power and therefore increases the speed; reducing pressure on the pedal reduces the power of the engine - this will help to slow the car down."
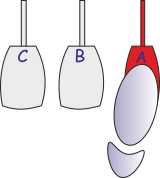
Footbrake
 Remember that this is an interactive lesson - not a boring monologue - ask your learner to practice pivoting between the footbrake and gas pedal. Also ask about the difference in feel between the two pedals - and use the answer to help you in your explanation.
The key teaching points are:
- Right foot use (only)
- Pivot the foot between accelerator and footbrake pedal
- Used for slowing and stopping
- Progressive, controlled use
- Activates brakes on all four wheels
- Operates the brake-lights
Explain that the footbrake is operated with the right foot (only), works the brakes on all four wheels and operates the brake lights.
In addition, briefly discuss progressive use in relationship to brake pedal pressure (the brake is not an 'on/off' switch).
Remember, the more interactive you can make the controls lesson, the more interesting it will be. By operating the controls your learner is taking an active part in the lesson as opposed to simply sitting and listening.
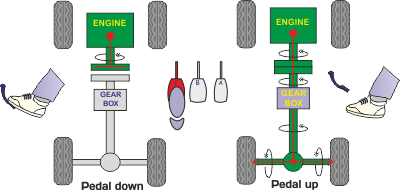
The clutch
 Avoid falling into the trap of getting into too much detail when describing the operation and use of the clutch - if you do, you are likely to confuse yourself!
With this in mind, lengthy explanations involving the dinner plates, power drills, thrust bearings, flywheels, pressure plates or any other weird and wonderful actual or metaphorical descriptive terms will simply serve to confuse your learner.
Keep it Simple!
The key teaching points are:
- Makes and breaks the link between the engine and the driving wheels.
- Is used to control the car when moving at very low speeds (biting range).
- Should be brought up all the way (except when performing clutch control).
- Is not a footrest!
It is sufficient to cover when and how the clutch should be used, with brief reference to the biting point. Also explain why it should not be used as a foot rest. Ask your learner to press and release the clutch gently and perhaps press the brake followed by the clutch as an example of the 'sequence of use'.
Handbrake (parking brake)
Operation of the handbrake should explained by allowing your learner to both release and apply the handbrake. When doing this ensure that your foot is firmly on the dual footbrake to keep the car secure.
The key teaching points are:
- Operates on the rear wheels only.
- Should only be used after the car has come to a complete halt.
- The button should normally* be pressed to avoid ratchet wear and, more typically, cable stretch.
- Usually has a warning light to indicate that it is applied
*See the information about the button below
It will generally be necessary to explain the need to pull the handbrake up slightly in order to press the release button.
While on the subject of the release button, the most common reason given for using the button rather than pulling the handbrake against the ratchet is that the ratchet can become worn out. While it's probably true that the ratchet will wear out over time, I've driven some very old vehicles over the years – some of which were not very well maintained - and I've never encountered a worn out ratchet! I've also never met a mechanic who has replaced a worn ratchet - and I've asked lots of mechanics.
What I have encountered, however, are stretched handbrake cables.
In my experience, drivers who consistently pull on 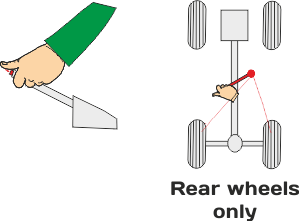 the handbrake against the ratchet end up with stretched cables and the handbrake that is virtually useless, even when it has reached its maximum length of travel.
Important: Some manufacturers recommend that the ratchet button should not be pressed in when applying the handbrake - our suggestion is use the button until the brake is on tight, and then pull a couple of clicks against the ratchet. This meets the manufacturer's guidelines to ensure that the brake is fully applied but also minimises the risk of excessive cable wear.
You might also mention that the parking brake can be located in different places in some vehicles, operated automatically (electronic) or operated with a foot pedal. If this leads to questions simply answer with "If you encounter a vehicle like that, refer to the manufacturers handbook for full information or give me a call".
If your training vehicle has an electronic handbrake briefly refer to manual handbrakes and tell the learners to consult the manufacturers handbook for any other vehicle he might drive.
When to use the handbrake
To help your learner decide when to use the handbrake, use the following rule:
"When a 'pause' becomes a 'wait', use the handbrake."
In simple, measurable terms, this means that if you can see your gap and are ready to go you will only be pausing and not waiting and so probably don't need the handbrake; otherwise - use it!
Explain that the handbrake is used when the car is stopped for more than a few seconds or is stopped on a hill and that it must always be used when parking in order to secure the car; but never used when the car is moving except in the highly unlikely case of footbrake failure.
Gears
It is easy to be over-technical when describing the gears. Here are some tips to help you to keep it simple.
The key teaching points are:
- Purpose of gears
- Position of the gears
- Holding the gear lever correctly
- Avoidance of looking down at the gear lever
- Sequence of use
An example of a simple and effective description might be as follows.:
"The correct gear should always be selected to match the road conditions and speed of the car. As the speed of the car increases higher gears are engaged. This is generally (but not always) done by changing the gears in sequence, that is, 1, 2, 3, 4, 5. However, changing down through the gears need not be sequential as a general rule.
For example, if you are travelling at 40mph you will usually use fourth gear.
If you want to stop, you can stop in fourth gear. If, however, you want to slow down to 20mph, and then continue to travel at that speed, third gear would make the car more responsive. If you wanted to slow down to 10mph and then continue to travel at that speed, second gear would make the car more responsive, so that is the gear that you would select. You will obviously learn more about the use of gears as your lessons progress and changing gear will become instinctive. All you need to know for now is the position of each gear and how to operate the gear lever."
You could then answer any questions that your learner may have and move on to a little static practise, getting your learner to select each gear in turn, pressing the clutch. Include a 4th to 2nd movement.
More detailed information about gear use can be given as and when required during later lessons. Familiarise yourself with the information in the example and then explain the gears to three or four different people in your own words.
Your explanations should be spontaneous and different each time - NOT rehearsed.
But what about elephants, horses, camels and bicycles?
Over the years I have come across many different methods of explaining how the gears work. All the explanations have a couple of things in common:
-
They try to explain the relationship between power, workload and speed.
-
They are generally confusing!
While an explanation that an elephant is very powerful but very slow, or a leopard has less power of an elephant but can go much quicker might make perfect sense to someone who understands about gears, the likelihood is that the someone who is trying to take in information about driving on their very first driving lesson it will just be a load of gobbledygook and soon forgotten!
If you must use any analogy, bicycle gears are probably the least confusing (assuming you are teaching a cyclist).
But generally speaking, explanations that include bicycles, clocks, winches or various animals are at best unnecessary and at worst totally confusing and impossible to remember. Keep it simple!
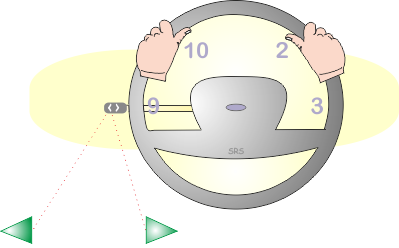
Steering wheel
 This lesson is not and should not include an in-depth tutorial about steering or signalling methods.
The key teaching points for the steering wheel are:
- Hand position on the wheel
- The pulling and pushing method
- Looking well ahead for positioning (brief reference only at this stage)
The main points here are maintaining a safe hand position on the wheel and the fact that both hands should be kept on the wheel, except when changing gear or operating other controls. The most important point to stress is the fact that effective steering is dependent upon effective observation - the hands follow the eyes.
Additional information about steering:
There are other reasons apart from control that make it worthwhile practice to hold the steering wheel 'correctly' (that is is the 'ten to two' or 'quarter to three' position). It has been reported that some people have been injured by their own arms and hands when an air bag has inflated in an accident. Another aspect of steering it is important is keeping the thumbs on the rim of the steering wheel rather than wrapped round the inside of the rim.
With thumbs inside the rim there is a possibility of injury to the hands if the car hits a pothole and the wheel spins (this becomes critically important during off-road driving).
Background information
It is debatable whether the pull-push technique is necessary for safe driving. In fact some expert schools of thought, including ourselves, believe it to be unsafe because it restricts the driver's natural flow.
Many driving instructors, DVSA examiners and police drivers tend to pull-push habitually in many situations and find it fairly comfortable for town driving. This is probably because it was drilled into them so hard during their training.
Many experienced high performance drivers position the car with total accuracy without ever pulling and pushing (as per the 'strict' method); some countries, like some UK experts, frown upon the pull-push method considering it to be dangerous! (the UK and Australia are the only countries where pull-push is regularly practiced.)
We believe that instructors put far too much emphasis on pulling and pushing – it is far more important to get your learners feeling confident about their ability to position the car accurately by looking in the right place and steering at the correct time.
The best steering method is one which the learner finds 'natural and flowing' - also, pull-push is not a driving test requirement. A lot of time and effort will be wasted if you insist on teaching pull-push.
Indicator switch
 The key teaching points are:
- Fingertip use.
- Move in direction of steering wheel rotation.
- Self-cancelling/Cancel after use.
- Activates flashers on the front, rear and sides of the vehicle.
At this stage, it is enough to cover the function and operation of the indicators (not general signal use). The best way to explain the use is probably to point out that the switch is pushed the same way as the wheel is turned.
Avoid the "Up for left, down for right" approach. This falls flat on its face as soon as the learner gets into a car with the switch on the opposite side! Make the explanation interactive by getting the examiner to operate the switch (ensuring 'finger tip control').
Briefly mention MSM and the importance of ensuring that indicators are cancelled after use. No more!
The next page covers typical issues for this lesson.