Lesson Structure
 In this section you will learn about how to structure a driving lesson.
We start with a short written tutorial (this page). This is a very basic overview of the core principles but will suffice for the understanding of how to structure your lessons.
We will then give a full lesson video example demonstrating how a lesson can be split into different parts, each part having a specific purpose.
The lesson example is in real-time and comprises around 55 minutes of video split in to five separate clips. There is also a 23 minute summary considering the lesson in relation to the Part-Three/Standards Check report form.
The component parts of a lesson
Good lessons have clearly identifiable parts with each part serving a specific purpose.
All lessons have two things in common:
A beginning:
This is where the lesson goals are discussed and the plan is agreed
An ending:
Lessons end with a recap/summary during which the learner is encouraged to reflect on their learning and to look forwards to the next lesson and any required preparation.
In the videos we have used the word ‘phase' to discuss the different parts of the lesson, so the above will become the beginning or starting phase, and the lesson ending phase. But the terminology is unimportant, your could call each part a chunk, a mini-lesson, or just a part!
The important thing is to remember that a lesson is not simply a long single stream of information - it's a group of related parts.
Between the beginning and ending
The format of the lesson between the start and end phases will depend of the type of lesson being taught but it will typically be split into at least two more 'lesson phases', each with a specific learning focus.
But before we look at the video examples it's worth understanding the concept of ‘chunking' and the ‘serial position effect'. It doesn't matter if you don't remember the terminology used here, the main goal will be to understand that good lessons are split into separate definable chunks that are easy for the learner to understand and achieve.
Chunking
 Chunking can be defined as "breaking a component into smaller 'chunks' of related information". Just as this sentence is can be broken down into words and the words can be broken down into letters.
Each driving lesson is made up of chunks of information – for the purpose of this tutorial, each chunk represents a lesson phase.
If you research ‘chunking' online you will discover that people learn best when information is presented in manageable 'bite sized' chunks.
They also learn best when the material being learned is connected to things they already know and has plenty of repetition (this is why training routes need to offer lots of opportunities to practise the main lesson subject).
Serial position effect
 Serial-position effect is the tendency of a person to recall the first and last items in a series best, and the middle items worst. This is known as the primacy and recency effect.
In simple terms this means that the more ‘beginnings and endings' (first and last) you have, the more people will remember. When you have more 'beginnings and endings' you will maximise the primacy and recency effect.
Learning chunk sizes will vary from person-to-person and from topic-to-topic but typically will be between 10 and 25 minutes.
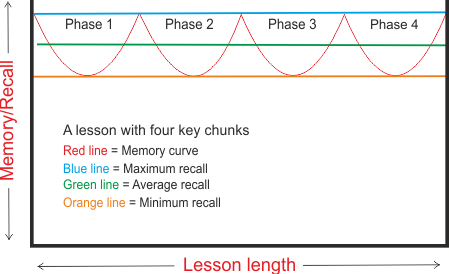
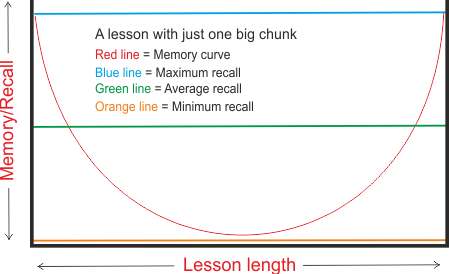
On the diagrams the average recall line (green line) is much higher in the lesson that is split into separate phases. By splitting lessons in this way the information will be easier to learn and, generally speaking, the lesson will be more interesting.
Information is recalled from the beginning and end of each phase. As the lesson moves on there will also be repetition and revision as the task is performed in a different situation or at a different skill level - these things also promote understanding and memory.
Typical lesson example
Note that all of the suggested timings in the 'four phase' below are for guidance only; there many different ways to split your lessons. Again, the important learning factor here is the principle of splitting your lesson into specific focused parts.
A typical one-hour lesson might have...
1. A five minute introduction followed by a ten minute drive out (Lesson Phase 1):
This might start with a discussion about the last lesson and any homework, goal setting and lesson planning.
The ‘drive out' would be a warm-up drive allowing the learner to settle in to the lesson.
During this warm up there might be discussion about issues from last lesson or background information for the main lesson subject. (The Drive-out is from the pick-up location or test centre to the main training area for the lesson.)
For example: If the lesson was pedestrian crossings the discussion could be around pedestrian safety – looking out for pedestrians during the drive.
For some learners the drive-out might be a short drive by the instructor in order to reach a suitable training area – this drive would be used to highlight key learning points (see the videos for an example).
2. A twenty minute tutorial and practise session on the core subject. (Lesson Phase 2):
During this session you might give a demonstration or briefing followed by practise, or depending on the learner's readiness, go straight into practise after a brief discussion about what will happen and how it will be done.
Continuing the pedestrian crossing example from above you might park up in view of a Zebra crossing, discuss the rules and then practise approaching the crossing several times (driving around the block to repeat the practise).
Note that this phase might include further stops and discussion, this would be dependent on what happened during the drive.
3. A ten minute development session in which the task becomes more ‘difficult' (Lesson Phase 3):
After the learner has grasped the basic principles, knowledge or skill, it's time for the lesson to move on. This might be by doing stuff independently, tackling a harder situation or transferring the skills to a related situation. Again there might (or might not) be a briefing/demonstration. However, there will be a brief introduction to discuss what is going to happen and how it will happen.
For our pedestrian crossing example the lesson might move from Zebra crossings to light-controlled, school or other specific crossing type.
4. A ten minute drive back generally practising the learned material on different roads followed by a five minute debrief/recap/reflection session. (Phase 4):
The drive-back is an opportunity to discuss the key learning from the lesson, applying the learning to whatever situations arise en-route. In the case of an absolute beginner the instructor might be driving the car.
The lesson ends with an interactive discussion and look forwards to what will happen next time.
Another example
Here's an example of a 'plan' for the stopping on the right manoeuvre - notice that this one has more, shorter chunks/phases:
- Lesson intro followed by drive to the first location: En-route the focus would be on where people stop and park, highlighting safe and unsafe examples on both left and right.
- Initial quiet location – recap straight reverse and then introduce the manoeuvre with demo or brief if required. Clear road – no parked cars if possible.
- Practice stopping/moving off a couple of times
- Practise stopping/moving off plus reversing a couple of times (should be enough for mastery if the learner is ready for the lesson)
- Repeat manoeuvre but this time pulling up behind a parked vehicle – discuss additional risk.
- Move to busier locations – practice in a couple of places.
- Drive back exploring what has been learned through the examples of good/bad parking seen en-route
- Recap/Reflect/Look forward
All the above would be coupled with ongoing development of general driving – dealing with any issues that arise and capitalising on any examples pertinent to the lesson. Possibly with a planned sat-nav route (pre-programmed) for directions.
Next: Starting the lesson...