Moving off and stopping: Example and info
Teaching moving off
 This lesson will normally start with you driving the car to a suitable location. As you will be doing this lesson with a new customer we suggest that you drive to a different location even if the learner lives on a quiet street. This is because their home location might be a distraction with friend. neighbours and family members around.
When you arrive at the location your first job is to ensure that the learner gets out of the passenger seat, and back into, the car (driver's seat) safely.
It's usually best to walk around the back of the car - that way the learner can see traffic approaching from behind and the drivers can see you - always get your customers to approach the driver's door from the rear. Skills for life: this is especially important with large 4x4 vehicles and vans.
Start your lesson, as usual, by finding out what your pupil already knows.
After having determined exactly whet you need to teach you can give an interactive briefing or demonstration - or whatever is required for the individual learner.
The 'Prepare, Observe, Move' routine, is an easy way to help your learners to remember the steps for moving off. Involve your learner in a 'dry run' as you go through any explanation, demonstration or recap of your actions on the drive out.
The notes below include information about what to cover in a briefing and how to instruct your pupil to move off and stop.
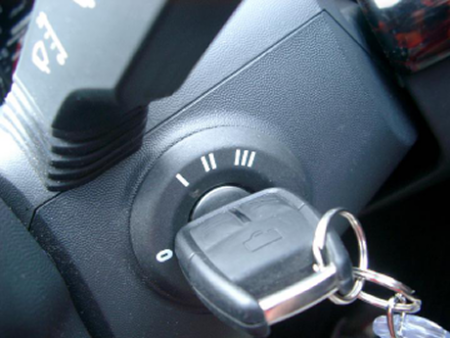
Prepare - Starting the engine
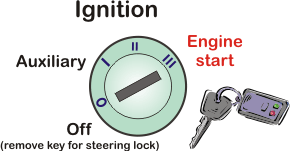 As explained above, ask whether your learner has started and engine before. If the answer is "yes", allow him/her to demonstrate this at the start of the briefing but watch carefully to make sure that the safety precautions are done - and done in the correct order.
Set the demonstration up clearly:
"OK, I'd like you to demonstrate the engine start for me – we will not be moving yet and will be switching the engine off again. I will watch you carefully and help you if necessary."
If the pupil has not started the engine before, explain each step starting with the handbrake/neutral check and including an explanation of the ignition switch positions and any safety precautions required for your vehicle (pressing the brake or clutch)
Talk through sequence
"Check that the handbrake is on, clutch down and start the engine by turning the key away from you. Let go of the key."
Prepare - Selecting first gear
Noting the position of the gear is not enough. You will need to remind your pupil to press the clutch down first - and to hold the clutch down after the gear lever has been moved into position. Stress that the clutch must be kept down until it is time to move.
Talk through sequence
"Clutch down, hand on the gear lever with your palm towards me, push the gear lever forwards to select first gear. Keep the clutch pressed down"
Prepare - Setting the gas
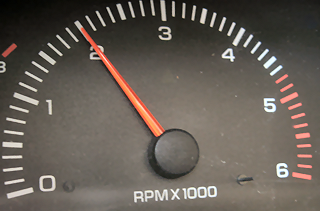 The DVSA have used the term 'a lively even hum' to describe the sound that the engine should make, however, your idea of 'a lively even hum' may differ from that of your learner. It's important to give a 'model' of what is required. You might do this in various ways, for example:
-
In some cars you can use the heater fan to illustrate the concept of accelerator pedal pressure (different speeds making different noises)
-
If your car is fitted with a 'rev counter' your pupil can set the gas by watching the needle
-
Demonstrate by setting the gas yourself and letting your pupil listen to the sound required.
If the engine has already been started and stopped as a separate exercise, you could practise this again - and teach how to set the gas at the same time, switching the engine off for the rest of your briefing.
It is important for learners to understand the need to set the gas (to ensure that the car has enough power to move away without stalling). Although it might seem obvious, make sure that your pupil knows what you want him/her to do when you say "Set the gas".
Talk through sequence
"Set the gas by pressing the pedal very gently with your right foot" (talk through any adjustments with "a bit more" or "a bit less".
Note: Some cars, especially diesels, will move away OK without the gas pedal being set, however:
1. there is less chance of stalling if the engine revs are raised
2. You are teaching skills for life - they may not have a car that moves without setting the gas after they pass the test.
Over time the process of setting the gas and bringing up the clutch will become almost instantaneous as it is with your own driving - however, it's useful to separate these actions in the early first stage of learning.
Prepare - Finding the biting point
You need to briefly explain what the biting (or holding) point is and why it is an essential part in preparing to move off.
Does your pupil understand what the clutch does? If not, use the in the VTS to briefly explain the biting point, keeping your explanation as simple as possible.
Example
(Using the VTS illustration)
"Here you can see a diagram of the clutch. When the pedal is pressed down the engine is disconnected from the wheels. As you bring the pedal up the engine connects to the wheels.
When the pedal is about half way up, as shown here, the clutch is at the biting point. At this point the two parts of the clutch are just touching but the car doesn't move. All that is needed to make the car move is to bring the clutch up a tiny bit, about the thickness of a pound coin"
Watch for co-ordination of clutch and handbrake. The handbrake should be prepared (note; not released at this point) by pressing the ratchet release button before the clutch biting point is found. When the handbrake is released on a level road, the car shouldn't move.
It's important to know your car. Some cars dip at the rear, in others you can feel a pull on the handbrake. For some you need to rely on the sound (or rev counter). Make sure that your customers recognise the relevant clues.
Talk through sequence
"Bring the clutch up very slowly until you here the engine note change and then hold both feet perfectly still" (Note: you will probably have to help with something like "Hold still now!")
Click here to read the DriverActive information about preparing the car to move.
Getting a feel for the pedals
This might be a good place to think about different 'models' that you might use to help your learners get the 'feel' of the pedals. As you will know, a key learning principle is moving from the 'known' to the 'unknown'. here are some examples of the ways that different pupils might accelerate their learning by linking the feel of the pedals to something that they already know about
How about comparing the pressure needed to operate the pedals with piano, organ or harp pedals? I trained a guitarist who used 'effects' pedals with his electric guitar, this was just what he needed to think about when 'feathering' the brake.
One lady was a keen baker (cakes and pastries), we finally got the feel for the gas pedal by comparing it with the pressure needed to rub flour and fat together when making pies! Setting the gas sounds like a food mixer (or at least it did for one gentleman).
There must be millions of comparisons that are valid in moving people from their everyday lives into their new role as drivers. The benefits of using ideas similar to those recounted here is that the learner has to 'engage his/her physiology' when thinking about certain activities.
Think about pressing the handle to flush the loo... As you press the handle (in your mind) now, notice just how much pressure you use at the start of the press, the resistance of the handle, notice the way that you ease the pressure once you have 'felt' that the handle has gone far enough. Now imagine that you are transferring that whole physical experience to your leg or foot and pressing a pedal in the same way...
That's quite a skill!
Observe - Blind spots
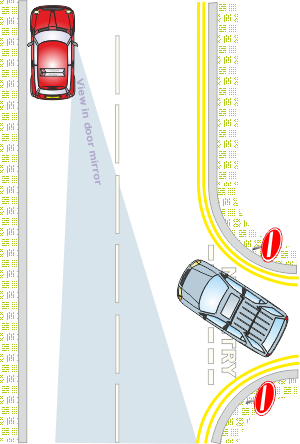 The VTS shows the area covered by the drivers door mirror and a grey car that is not visible in the mirrors because it is in the blind spot. Use this to explain the concept of blind areas and the dangers of not checking them.
Learners must understand that vehicles could be come out of gateways or a garages; or that it might not be a car at all, for example, it could be a child running across the road.
Many drivers fail to make a right shoulder check before moving off. This is probably because they never 'got into the habit' when they were learning to drive. Make sure that this does not happen with your pupils!
Observe - Observation method
Here you need to explain that it is always important the road is clear behind before any action - in other words, briefly explain the MSM routine.
Ideally you should teach (and use) 'all around' (six point check) observation: Left shoulder; Left door mirror; Interior mirror; right door mirror; right shoulder (the six point check).
Note that some driving test examiners do not like the 'six point check' method, simply because it has been over-used by some (badly trained) test candidates in the past. Make sure that you that you fully understand the notes about 'looking too much' on the moving off page at DriverActive.
Observe - Signals
 Keep this as simple as possible. If there is anyone to benefit from a signal, give one, if not, don't.
Avoid the temptation to be over zealous! An elderly pedestrian 200 metres away is unlikely to benefit from a signal - keep the message as simple as possible.
Observation talk through sequence:
"Check your interior mirror; we need to wait for the blue car to pass, Now check your drivers door mirror and look over your shoulder to check your blind-spot. The road is clear..."
Move - Releasing the handbrake
The car should not move as the handbrake is released.
Taking time to get this right at an early stage will help to prevent the 'kangaroo petrol' effect later on!
Move - Bringing the clutch up
Clutch-control is probably the most important manipulative skill that you will teach. Stress that the clutch must be brought up very slowly - and held still momentarily when the car starts to move.
In order to achieve this successfully you might well need to talk the clutch up, literally millimetre-by-millimetre.
Move - Safety line
It can be useful to introduce the concept of a safety line to help with steering.
'Safety line' is simply a term that can help you to describe an 'imaginary line' ahead of the vehicle which indicates the path that the vehicle is going to follow. When the (imaginary) is followed it keep the vehicle a minimum of one metre from the kerb or from any obstruction. Get your learners to imagine the safety line well ahead.
Move - Talk through sequence
"... Release the handbrake and bring the clutch up until the car starts to move, feet still and both hands on the steering wheel, steer very slightly to the right to bring us out to the safety-line, about three feet from the kerb. Check your interior mirror and driver's door mirror to make sure that it is still safe behind".
Teaching Stopping
 Learner drivers need to understand not only how to stop the car, but also when and where to stop the car.
Stopping is easiest when done for the first time in second or third gear from about 15 mph, this is why it can be a good idea to teach moving off and stopping as two separate subjects.
If teaching stopping as a separate subject you can leave it out of your moving off briefing if you give one(although it's worth leaving it in a demonstration).
The way to split the subjects is to teach moving off and then stop the car yourself using the dual-controls and explaining the process. Do this a few times and in the meantime teach the learner to change up to second or third gear. Their first solo stop would then be from around ten or fifteen mph.
For a full explanation see the lesson guides area at adimasterclass.co.uk.
Stopping - Mirrors
Explain why mirrors are essential before stopping.
Put the emphasis on staying safe, looking in the mirrors for threats or danger.
The decision to stop cannot be finalised until the driver knows that it is safe to do so - this requires at least one mirror check. If the mirror check reveals an out of control lorry behind, or another car seriously tailgating, then the stop will be aborted or modified accordingly to make it safe.
Stopping - Signal
 A simple rule is, if you have checked all around and are unsure about whether to signal, a signal will probably be a good idea.
By teaching this rule, you make it easier for the learner to make a decision, you also introduce the important concept that it is OK to be unsure sometimes (after all it is uncertainty and curiosity that form the basis of safe, defensive driving).
The first time you stop YOU might need to make the decision about whether or not to signal - involve the pupil in the mirror checking and explain the reasons why a signal is/isn't needed.
The key reason for signals is to help or warn other road users. If your learners give signals out of habit (as opposed to giving signals after considered thought), sooner or later they will mislead another driver, cyclist or pedestrian, possibly with disastrous consequences (and possibly in your car during a driving test!).
Stopping - Control
The basic tuition points here are use of the footbrake and clutch. With a little talk-through you should be able to get most pupils to ease the brake pressure as the car stops and achieve a smooth stop in their first lesson.
Some instructors get hung up about coasting when teaching new pupils to stop. There are two points to consider here:
-
If there is no problem present, there should be no need to introduce one into your conversations!
-
Within reason, coasting is not about how far the car travels with the clutch down, but whether or not it is under control. There should be no problem letting the car roll a couple of car lengths (or even three?) with the clutch down, as long as the car's momentum has been 'killed' with the brake. Getting the clutch out of the way allows the pupil to concentrate on smooth footbrake use.
 Have you ever seen, or experienced learners who cannot pull up parallel to the kerb? They act as if the car is frightened of getting too close! You will often see them with the back or front of the car sticking out! This is simply an observation problem.
The usual fix for many instructors seems to be to get the learner to line up the wipers, or a point on the bonnet, with the kerb; but this method is flawed in that it takes away many of the natural cues that our brains use to space and position and often exacerbates the problem.
For accurate positioning our brains need to make comparisons between where the body is in relation to other objects. By looking down at the bonnet and kerb the brain has only two things to work on (as opposed to the thousands that it normally uses).
A more useful method is to get your learners to watch the road well ahead, this way they see other potential dangers as well! Kill the speed before moving in and then keep the pupil's eyes aimed well ahead for positioning - line up with a car ahead if there is one available.
Precautions after stopping
Explain the importance of handbrake and neutral (in that order) to secure the car after stopping; making sure that the clutch stays down! As with all other aspects of the manoeuvre, you will need to prompt this - if you just expect the pupil to remember you will end up stalled in a 'heap'!
Next: Step 4 - Moving off and stopping issues and Checkpoint...