A safe wheel change process
OK. So changing a wheel is something that you don't do unless you absolutely have to! And you can bet it will be raining or snowing, on a narrow road or in busy traffic.
Some drivers never get a flat tyre. I find that they tend to come in threes! I can go ten years without a puncture and then I get three in the same month.
You can drive around hoping that it won't happen, call the AA or stand and luck helpless at the side of the road. Or you can learn how easy it is to change a wheel.
 It will take about 25 minutes the first time you do it (unless of course you drive a big yellow digger - then it will take all morning!). The steps to take are outlined on the project worksheet.
Find out about your car
On a warm sunny afternoon, park your car on the driveway or a flat car park and find all the wheel changing bits and pieces, these are usually with the spare wheel*. There should be a jack to lift the car up, a spare wheel and a wheel brace (this is a kind of spanner thing!).
Take all these things out of the car before starting the wheel changing process. And make sure that the handbrake is firmly applied (in an automatic also select 'Park').
Any occupants should also exit the vehicle before the wheel change process begins (either for a practise wheel change or in the event of a real wheel change emergency). The AA video in the next step explains the process.
*Some cars are now sold without a spare wheel, our recommendation is that these are not the best option for driving school vehicles. Others have space saver spares - these are not acceptable for driving tests. Deciding whether to carry a full spare wheel is a business decision - how much risk do you want to take?
Read read the eight step wheel change notes on the right (download pdf worksheet here).
Next: Watch the video in Step 3 and then, when a good weather opportunity arises, practise the wheel change procedure on your vehicle.
1. Take off the wheel trim
The wheel trim is the bit that makes the wheel look pretty. Some cars have alloy wheels (shiny gray coloured metal) - these don't usually have  wheel trims.
The wheel brace will often have a flat end that can be used to ease off the wheel trim, if not a screwdriver or similar tool or object will do the job.
Note: not all cars have wheel trims. If you have allow wheels the trim might simply be a small circular disc, alternatively the wheel nuts might be exposed.
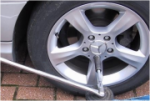 2. Loosen the wheel nuts
Loosen the wheel nuts with the wheel brace (spanner thing!). They can be quite tight.
By sliding a length of steel pipe, 40 to 60cm long should be enough, on to the end of the wheel brace, you can get more leverage.
If you lack strength, for whatever reason, it might be worth investing in a long handled wrench (spanner thing!) to keep with the wheel change stuff in your boot.
IMPORTANT: At this point you are simply loosening the nuts a little bit - no more than one turn. The reason for doing this before the car is jacked up is because the vehicle will be less stable on the jack than it is on the ground.
 3. Make sure that the handbrake is on.
If changing a rear tyre it is a good idea to 'chock' the front wheels with bricks, stones, wooden blocks or whatever you can find by the roadside. Because the handbrake only works on the rear wheels you will only have one wheel holding the car still when you jack up the rear of the car.
Leaving the car in gear (with the key out of the ignition) will also help to prevent accidental movement.
Jack up the car.
Be careful to ensure that the jack is located at the correct point beneath the car – it is important that you check the vehicle handbook when locating the jacking point, it will vary from car to car.
IMPORTANT SAFETY NOTES:
Never place any part of your body beneath a car supported only by a jack.
Never start the engine while the car is on the jack
4. Take off the wheel
Remove the wheel nuts and take off the wheel.
Make sure that you put the wheel nuts in a safe place; they have a habit of rolling off into the grass, or worse, down a grid!
Be careful when removing the wheel, the tyre might have debris embedded that could cause a nasty cut – with this in mind it is worth keeping a pair of thick gloves in your wheel change kit.
5. Replace the wheel
Put on the spare wheel.
Note: when replacing a flat tyre you might need to raise the car a bit higher on the jack to make room for the spare.
It can sometimes be a bit tricky to get the wheel in place, be patient or you might damage the threads on the wheel studs – the bits that the nuts screw on to.
6. Replace the nuts
Replace the wheel nuts. Finger tight at first and then just a bit tighter using the spanner thing (wheel brace). If the nuts have a bevelled edge it goes on the inside with the flat edge to the outside.
If one has rolled down a drain you can manage with three – but drive slowly and carefully until the fourth nut is replaced. If more than one is lost, you can 'steal' one from another wheel.
7. Lower the jack
Lower the car to the ground and then tighten the nuts.
It's good practice to tighten the wheel nuts in stages. half tighten a nut, do the same with the nut diagonally opposite, repeat with the other two nuts; then repeat the process to fully tighten the nuts.
Generally speaking, you should get them as tight as you can using the wheel brace. Ideally you will get the wheel checked at a garage to ensure that the nuts are tightened to the correct manufacturers setting.
 8. Replace the trim
Replace the wheel trim (get one side fitted and then give it a sharp thump!).
In a real puncture situation you would possibly leave this bit until you get home.