How to park
 As you know, during the ADI Driving test you will be doing this manoeuvre with just one vehicle.
Because reversing into an empty, unbounded space is different to reversing into a clearly defined gap, you may need to practise quite a lot before becoming truly proficient at parking behind a single vehicle.
If you have two cars in the family, or a friend with a car, it might be best to use their car as your 'target' vehicle while practising rather than incur the wrath of a stranger by repeatedly reversing around his/her vehicle. Alternatively, practice with different cars, never using the same 'target' more than a couple of times.
Practise on quiet roads until you are easily able to meet the accuracy targets move on to a slightly busier location so that you are forced to keep a good look out for other road users (see the next page for an alternative practise method).
With proper observation and accuracy
This information is similar given in the DriverActive Learner's Site, however it is equally applicable at any standard of driving.
Step 1:
Select a suitable parking position by looking well ahead. For exam practice, pull in and park on the left behind the target vehicle before moving on to step 2 below.If you are parking between two cars in a busy street it's a good idea to stop momentarily alongside the gap. This allows you to double check the space is big enough (at least one-and-a-half car lengths), you can also use the opportunity to make sure that any drivers behind know what you are doing.
Step 2:
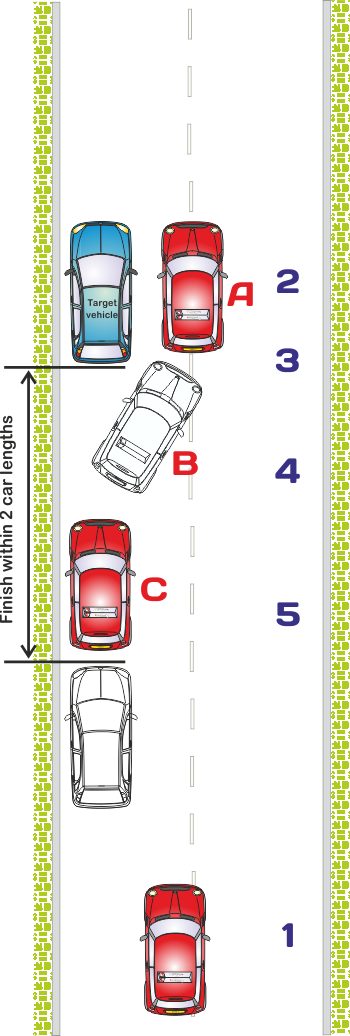
When safe to do so, pull forwards and stop alongside, and parallel to, the car that you wish to park behind, making sure that you make fullest use of mirrors and signa ling if necessary.Aim to stop about two feet from the target vehicle (two to three mirror widths as a rough guide) with the front of your car approximately level with that of the target (position A); if you prefer you can move forward to a position where your bonnet is about half a car length in front of the other car.
If for any reason it isn't safe to stop, drive around the block and come back to the space again.
Step 3:
Select reverse gear to show the reversing lights - this alerts others to the fact that you are parking - you might also use a left indicator to reinforce the fact that you are stopped. In some situations hazard lights might be appropriate, but be careful - the Highway code states that hazard lights are only to be used when stationary or when slowing down rapidly on high speed roads - if you use them, switch them off before you move.When the road is clear all around, drive slowly back, steering into the space. If the road is not clear, apply the handbrake, checking all around again (especially the right blind spot) before starting to reverse. Be prepared to give way to others - and be aware of pedestrians on the opposite side of the road, they might cross the road and walk behind your vehicle.
You should reverse into the 'space' at an angle of approximately 45° to the centre of the gap (position B); to do this you might need full lock (the videos in Steps 5 & 6 will demonstrate when and how much to steer). As you move back, keep the speed down (a slow walking pace or less) and keep a look-out for traffic and pedestrians. If any traffic approaches, take the usual manoeuvring precautions. (see the diagram on the next page for a guide to getting an appropriate angle.
You must be within a maximum of two car lengths behind the target vehicle at all times during your test, if you go back further you will be marked down for not being sufficiently accurate.
Step 4:
When the front of your car is clear of target car, steer briskly to the right and continue to reverse slowly. Note that the car might want to 'roll' down the camber towards the gutter at this point - if this is the case, or if you are doing this manoeuvre on a downhill slope, keep the clutch down and control the speed with the footbrake.Step 5:
Stop. If necessary, select first gear and drive slowly forward to straighten up (position C).Take care not to hit the kerb or rub your tyres along the kerb edge. Apart from a test fail, this could weaken the side-walls causing the tyres to blow out at a later date, possibly when travelling at high speed.
Next: Move on to step 4 for an easy learning/practise method and a guide to getting your 'angle' right.